|
Battle of Rufiji Delta
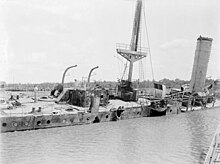
The Battle of the Rufiji Delta was fought in German East Africa (modern Tanzania) from October 1914–July 1915 during the First World War, between the German Navy's light cruiser SMS Königsberg, and a powerful group of British warships. The battle was a series of attempts, ultimately successful, to sink the blockaded German light cruiser. BackgroundIn 1914 the most powerful German ship in the Indian Ocean was the light cruiser Königsberg. After an engine failure following her sinking of the British protected cruiser HMS Pegasus, Königsberg and her supply ship Somali hid in the delta of the Rufiji River while Königsberg's damaged machinery was transported overland to Dar es Salaam for repair. The British cruiser HMS Chatham discovered Königsberg in the delta towards the end of October. On 5 November, two additional British cruisers, HMS Dartmouth and Weymouth, arrived at the scene, and blockaded the German ship in the delta. In early November, Chatham opened fire at long range and set fire to Somali, but she failed to hit Königsberg, which promptly moved further upstream. The British ships were more powerful than Königsberg, but were unable to navigate the delta. The crew of Königsberg camouflaged their ship so it looked like the forest around the delta. Blockade  The British made several attempts to sink Königsberg including one to slip a shallow-draught torpedo boat (with escorts) within range, an operation easily repulsed by the force in the delta. A blockship, the Newbridge, was sunk by the British across one of the delta mouths to prevent her escape; however, it was soon realized that Königsberg could still escape through one of the delta's other channels. Dummy mines were laid in some of these alternatives, but they were considered a doubtful deterrent.[1] A civilian pilot named Cutler was hired to bring his Curtiss seaplane for reconnaissance; his plane was shot down, although the presence of the elusive cruiser was verified.[2] A pair of Royal Naval Air Service Sopwith seaplanes were brought up with the intention of scouting and even bombing the ship, but they soon fell apart in the tropical conditions. A trio of Short seaplanes[3] fared a little better, managing to take photographs of the ship before they were grounded by the glue-melting tropical heat and German fire.[4] Attempts to use the 12 in (300 mm) guns of the old battleship HMS Goliath to sink the cruiser were unsuccessful, once again because the shallow waters prevented the battleship getting within range. Alongside aerial reconnaissance, part of the Navy's strategy for locating and planning the destruction of the Königsberg was extensive shore-based reconnaissance and survey work in the German-occupied delta, which included close observation of the ship's position and its useable armaments (guns, torpedoes), the determination of channels in the delta navigable by the target vessel and proposed attacking monitors, and a month-long monitoring of tidal water depths at a key sea location for Goliath just offshore. This work was led by P J Pretorius, a noted tracker and big game hunter with previous exposure to the delta, who was recruited by the Navy from his rural home in Transvaal (now Limpopo Province).[5] However, by March 1915 Königsberg's food supplies were low, and many crew members had died from malaria and other tropical diseases. Generally cut off from the outside world, the morale of the sailors fell. However, the situation was marginally improved with a scheme to resupply the ship and give her a fighting chance to return home. A captured British merchant ship, Rubens, was renamed Kronborg and given a Danish flag, papers, and a crew of German sailors specially selected for their ability to speak Danish. She was then loaded with coal, field guns, ammunition, fresh water, and supplies. After successfully infiltrating the waters of East Africa, she was intercepted by the alerted HMS Hyacinth, which chased her to Manza Bay. The trapped ship was set on fire by the crew and left. The Germans later salvaged much of her cargo, which was later used in the land campaign, and some transported to Königsberg.[6] Sinking  Two shallow-draught monitors, HMS Mersey and Severn, were towed to the Rufiji from Malta by the Red Sea, reaching the delta in June 1915. With non-essential items removed, added armour bolted on, and covered by a full bombardment from the rest of the fleet, they ran the gauntlet. Aided by a squadron of four land aircraft, two Caudrons and two Henry Farmans,[7] based at Mafia Island to spot the fall of shells, they engaged in a long-range duel with Königsberg, which was assisted by shore-based spotters. Although Mersey was hit and the monitors were unable to score on the first day, they returned again on 11 July. Finally, their 6 in (150 mm) guns knocked out Königsberg's armament and then reduced her to a wreck. At around 14:00, Looff ordered her scuttled with a torpedo.[8] After the battle, the British were unquestionably the strongest naval power in the Indian Ocean. AftermathThe next day, 33 German dead were buried by the 188 remaining crewmen. A plaque reading "Beim Untergang S.M.S. Königsberg am 11.7.15 gefallen..." ("Killed in action during the sinking of SMS Königsberg on 11 July 1915...") was placed near the graves, followed by a list of the dead. The Germans recovered Königsberg's ten 105-millimetre (4.1 in) quick-firing guns, mounted them on improvised field carriages, and used them with great success as powerful field guns in their guerrilla campaign against the Allies around East Africa. The guns were used as harbor fortifications in Dar es Salaam, with one being remounted onto the passenger ship Graf von Götzen. The last gun was not knocked out until October 1917.[9] The remaining crew from Königsberg went on to serve as ground troops under General Paul von Lettow-Vorbeck. Three of Königsberg's 105-mm guns survived; one is on display outside Fort Jesus, Mombasa, Kenya, another outside the Union Building in Pretoria, South Africa and the third at Jinja Barracks in Uganda. There are stories of another in the Congo, but no details have been forthcoming. Depiction in media
Notes
References
External linksWikimedia Commons has media related to Battle of Rufiji Delta. |
||||||||||||||||||||||||||||||||
Portal di Ensiklopedia Dunia


