|
Bolted jointA bolted joint is one of the most common elements in construction and machine design. It consists of a male threaded fastener (e. g., a bolt) that captures and joins other parts, secured with a matching female screw thread. There are two main types of bolted joint designs: tension joints and shear joints. The selection of the components in a threaded joint is a complex process. Careful consideration is given to many factors such as temperature, corrosion, vibration, fatigue, and initial preload.[1] Joint typesTension jointThere are two types of tension joint: non-preloaded and preloaded.[2] Non-preloaded tension jointThese joints are not tightened to a precise preload, and the tension is mainly used to keep parts together without generating a high clamping force. An applied tensile load may cause separation of the joint. This type of joint should not be used where it is frequently subjected to variations of tensile loading.[2] Preloaded tension joint In these joints, the bolt is tightened to apply a specific preload, generating a tensile force in the bolt and an equal compressive force in the clamped parts. This ensures that any applied tensile loads are distributed between the bolt and the clamped parts (see theory section), which has some advantages:
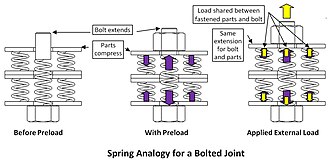
The joint should be designed so that the preload always exceeds the external tensile load to prevent separation. If the external tensile load exceeds the preload, the joint will separate, allowing relative motion between the components, potential bolt loosening, and increased load on it. In both the preloaded tension and slip-resistant shear joints, some level of preload in the bolt and resulting compression in the clamped components is essential to the joint integrity. The preload target can be achieved by a variety of methods: applying a measured torque to the bolt, measuring bolt extension, heating to expand the bolt then turning the nut down, torquing the bolt to the yield point, testing ultrasonically, or by applying a certain number of degrees of relative rotation of the threaded components. Each method has a range of uncertainties associated with it, some of which are very substantial.[4] Shear jointThere are two types of shear joint: slip-resistant and the bearing type.[2] Slip-resistant shear jointThe bolt is tightened to a specified preload in these joints. This preload generates friction between the clamped parts, allowing shear loads to be transferred through the joint faces via friction, rather than being carried directly by the bolt. Relative motion between the clamped parts is prevented and thus any fretting wear that could result in the development of fatigue cracks. Any tensile loads applied to these joints, usually have a secondary effect, but they do reduce the effective preload. The relative stiffness of the bolt and the connected parts is less critical in calculating preload for a slip-critical joint compared to a preloaded tension joint (see theory section). Methods of applying preload are described in the preloaded tension joint section. Bearing type shear jointThese joints are not tightened to a precise preload, and the tension is mainly used to keep parts together without generating a high clamping force. In this type of joint, the shear load is transmitted through bearing contact between the bolt and the walls of the bolt holes in the connected parts. When a shear load is applied, the connected parts move and the bolt shank makes contact with the hole walls, which transfers the load from the parts to the bolt. This causes a shear stress in the bolt at the junction of the connected parts, which it resists through its shear strength. As bearing type joints rely on this direct contact, they are more susceptible to wear and deformation of the bolt holes under high or repeated loads, which can lead to bolt fatigue or elongation of the holes over time. Any tensile loads applied to these joints, usually have a secondary effect, but they can reduce available shear strength of the bolt. A clevis linkage, which relies on a locking mechanism (like lock washers, thread adhesives, and lock nuts), is a bearing type shear joint. TheoryKey conceptsTypically, a bolt is tensioned (preloaded) by the application of a torque to either the bolt head or the nut. The applied torque causes the bolt to "climb" the thread causing a tensioning of the bolt and an equivalent compression in the components being fastened by the bolt. The preload developed in a bolt is due to the applied torque and is a function of the bolt diameter, the geometry of the threads, and the coefficients of friction that exist in the threads and under the torqued bolt head or nut. The stiffness of the components clamped by the bolt has no relation to the preload that is developed by the torque. The relative stiffness of the bolt and the clamped joint components do, however, determine the fraction of the external tension load that the bolt will carry and that in turn determines preload needed to prevent joint separation and by that means to reduce the range of stress the bolt experiences as the tension load is repeatedly applied. This determines the durability of the bolt when subjected to repeated tension loads. Maintaining a sufficient joint preload also prevents relative slippage of the joint components that would produce fretting wear that could result in a fatigue failure of those parts. The clamp load, also called preload of a fastener, is created when a torque is applied, and so develops a tensile preload that is generally a substantial percentage of the fastener's proof strength. Fasteners are manufactured to various standards that define, among other things, their strength. Torque charts are available to specify the required torque for a given fastener based on its property class (fineness of manufacture and fit) and grade (tensile strength).  When a fastener is tightened, a tension preload is develops in the bolt, while an equal compressive preload forms in the clamped parts. This system can be modeled as a spring-like assembly, where the clamped parts experience compressive strain, and the bolt tensile strain. When an external tensile load is applied, it reduces the compressive strain in the clamped parts and increases the tensile strain in the bolt. The load carried by the bolt and the clamped parts is in proportion to their stiffness because they both experience the same induced strain. As a result, the external load is shared across the joint rather than being solely carried by the bolt. In a well-designed joint, about 10-20% of the applied tensile load is carried by the bolt with the greater part transferred through the clamped parts because they are much stiffer than it. This reduction in the proportion of load transferred to the bolt is important in applications with cyclic loading, as bolts have low fatigue strength due to the stress concentration in their threads.[5] In some applications, joints are designed so that the fastener eventually fails before more expensive components. In this case, replacing an existing fastener with a higher strength fastener can result in equipment damage. Thus, it is generally good practice to replace old fasteners with new fasteners of the same grade. FormulasThe force in the bolt of a joint, which has not separated, is[6]and in the clamped partswhere is the external applied force, and is the bolt preload. The portion of an external load carried by the bolt is the joint stiffness ratiowhere is the stiffness of the bolt, is the stiffness of the clamped parts Separation of the clamped parts occurs when the force at the clamped surfaces is zero () thus the separation force isSeparation under the bolt head occurs when the force in the bolt is zero thus the separation force is,  The accompanying graph and table illustrate how the relative stiffness of the clamped parts and the bolt affects the portion of applied load carried by it. For example, when the stiffness of the clamped parts equals that of the bolt (the blue curve), an external load in the range from minus to plus twice the preload results in only 50% of the applied load being transferred to the bolt, as the total load in the bolt only varies by twice the preload. If the tensile applied load exceeds twice the preload, the clamped parts separate, and the bolt carries the entire load. Conversely, if the compressive load is lower than twice the preload, separation at the bolt head occurs, and the force in the bolt is zero. The curve representing a clamped parts-to-bolt stiffness ratio of 0.01 shows that when the relative stiffness of the clamped parts is very low, almost all of the load is transferred to the bolt, down to the point where a compressive load equals the preload, and separation at the bolt head occurs, reducing the force in the bolt to zero.
Calculating the torqueEngineered joints require the torque to be chosen to provide the correct tension preload. Applying the torque to fasteners is commonly achieved using a torque wrench.[7] The required torque value for a particular fastener application may be quoted in the published standard document, defined by the manufacturer or calculated. The side of the threaded fastening having the least friction should receive torque while the other side is counter-held or otherwise prevented from turning. A common relationship used to calculate the torque for a desired preload takes into account the thread geometry and friction in the threads and under the bolt head or nut. The following assumes standard ISO or National Standard bolts and threads are used: where
The nut factor K accounts for the thread geometry, friction, pitch. When ISO and Unified National Standard threads are used the nut factor is:[8] where
When = = 0.15, the dimensions used correspond to any size coarse or fine bolt, and the nut factor is K ≈ 0.20, the torque/preload relationship becomes: A study of the effect of torquing two samples, one lubricated and the other unlubricated, 1/2 in.- 20 UNF bolts to 800 lb-in, produced the same mean preload of 7700 lbf. The preloads for the unlubricated bolt sample had a standard deviation from the mean value of 1100 lbf, whereas the lubricated sample had a standard deviation of 680 lbf. If the preload value and torques are used in the above relation to solve for the nut factor it is found to be K = 0.208, which is very close to the recommended value of 0.20 [8]
The preferred bolt preload for structural applications should be at least 75% of the fastener's proof load[7] for the higher strength fasteners and as high as 90% of the proof load for permanent fasteners. To achieve the benefits of the preloading, the clamping force must be higher than the joint separation load. For some joints, multiple fasteners are required to secure the joint; these are all hand tightened before the final torque is applied to ensure an even joint seating. The preload achieved by torquing a bolt is caused by the part of the torque that is effective. Friction in the threads and under the nut or bolt head uses up some fraction of the applied torque. Much of the torque applied is lost overcoming friction under the torqued bolt head or nut (50%) and in the threads (40%). The remaining 10% of the applied torque does useful work in stretching the bolt and providing the preload. Initially, as the torque is applied, it must overcome static friction under the head of the bolt or nut (depending on which end is being torqued) and also in the threads. Finally, dynamic friction prevails and the torque is distributed in a 50/40/10 % manner as the bolt is tensioned. The torque value is dependent on the friction produced in the threads and under the torqued bolt head or nut and the fastened material or washer if used. This friction can be affected by the application of a lubricant or any plating (e.g. cadmium or zinc) applied to the threads, and the fastener's standard defines whether the torque value is for dry or lubricated threading, as lubrication can reduce the torque value by 15% to 25%; lubricating a fastener designed to be torqued dry could over-tighten it, which may damage threading or stretch the fastener beyond its elastic limit, thereby reducing its clamping ability. Either the bolt head or the nut can be torqued. If one has a larger bearing area or coefficient of friction it will require more torque to provide the same target preload.[10] Fasteners should only be torqued if they are fitted in clearance holes. Torque wrenches do not give a direct measurement of the preload in the bolt. More accurate methods for determining the preload rely on defining or measuring the screw extension from the nut. Alternatively, measurement of the angular rotation of the nut can serve as the basis for defining screw extension based on the fastener's thread pitch.[11] Measuring the screw extension directly allows the clamping force to be very accurately calculated. This can be achieved using a dial test indicator, reading deflection at the fastener tail, using a strain gauge, or ultrasonic length measurement. Bolt preload can also be controlled by torquing the bolt to the point of yielding. Under some circumstances, a skilled operator can feel the drop off of the work required to turn the torque wrench as the material of the bolt begins to yield. At that point the bolt has a preload determined by the bolt area and the yield strength of the bolt material. This technique can be more accurately executed by specially built machines. Because this method only works for very high preloads and requires comparatively expensive tooling, it is only commonly used for specific applications, primarily in high performance engines.[12][13] There is no (as yet) simple method to measure the tension of a fastener in situ. All methods, from the least to most accurate, involve first relaxing the fastener, then applying force to it and quantifying the resultant amount of elongation achieved. This is known as 're-torqueing' or 're-tensioning' depending on which technology is employed. Technologies employed in this process can be: An electronic torque wrench is used on the fastener in question, so that the torque applied can be measured as it is increased in magnitude. Recent technological developments have enabled tensions to be established (± 1%) by using ultrasonic testing. This provides the same accuracy to that of strain gauging without having to set strain gauges on each fastener. Another method that indicates tension (mainly in erecting steel) involves the use of crush-washers. These are washers that have been drilled and filled with orange RTV. When a given force has been applied (± 10%), orange rubber strands appear. Large-volume users (such as auto makers) frequently use computer-controlled nut drivers. With such machines, the computer is in control of shutting off the torque mechanism when a predetermined value has been reached. Such machines are often used to fit and tighten wheel nuts on an assembly line, and have also been developed for use in mobile plant tire fitting bays on mine sites. Thread engagementThread engagement is the length or number of threads that are engaged between the screw and the female threads. Bolted joints are designed so that the bolt shank fails in tension before the threads fail in shear, but for this to hold true, a minimum thread engagement must be achieved. The following equation defines this minimum thread engagement: [14] Where Le is the thread engagement length, At is the tensile stress area, D is the major diameter of the screw, and p is the pitch. This equation only holds true if the screw and female thread materials are the same. If they are not the same, then the following equations can be used to determine the additional thread length that is required:[14] Where Le2 is the new required thread engagement. While these formulas give absolute minimum thread engagement, many industries specify that bolted connections be at least fully engaged. For instance, the FAA has determined that in general cases, at least one thread must be protruding from any bolted connection. [1] Failure modesWhen doing a failure mode analysis for bolts that have broken, come loose or corroded, careful consideration must be given to the below failure modes:
Bolted joints may be used intentionally as sacrificial parts, which are intended to fail before other parts, as in a shear pin. Locking mechanisms Locking mechanisms keep bolted joints from coming loose. They are required when vibration or joint movement will cause loss of clamp load and joint failure, and in equipment where the security of bolted joints is essential. A prevalent test for the self-loosening behaviour is the Junker test.
Bolt banging
Bolt banging occurs in buildings when bolted joints slip into "bearing under load", thus causing a loud and potentially frightening noise resembling a rifle shot that is not, however, of structural significance and does not pose any threat to occupants. A bolted joint between two elements may act as a bearing-type joint, or a friction joint. In the friction joint, the elements are clamped together with enough force that the resultant friction between the clamped surfaces prevents them from slipping laterally over each other. In the bearing joint, the bolt itself limits lateral movement of the elements by the shank of the bolt bearing upon the sides of the holes in the clamped elements. Such joints require less clamping force, because a high level of friction between the clamped surfaces is not required. The clearance between the bolt and the holes means that some lateral movement may occur before the bolt bears against the sides of the holes. Even when designed as a bearing joint, the surface friction between the clamped elements may be sufficient to resist movement for some time, especially when the building may not yet be fully loaded – thus it operates initially as a friction joint. When the lateral force becomes sufficient to overcome this friction, the clamped elements move until the sides of the holes bear against the shank of the bolt. This movement – "slip into bearing" – usually starts and stops very suddenly, often releasing elastic energy in the associated elements, resulting in a loud but harmless bang.[18] International standards
See also
References
External linksWikimedia Commons has media related to Bolted joints.
|
|||||||||||||||||||||||||||||||||||||||||||||||||


